Clamps explained: bar, pipe, F-style, parallel and spring, and how many
How F-style, one-handed, parallel, pipe, bar, spring and C-clamps differ, what capacity and throat depth mean, and how many clamps a home workshop really needs.
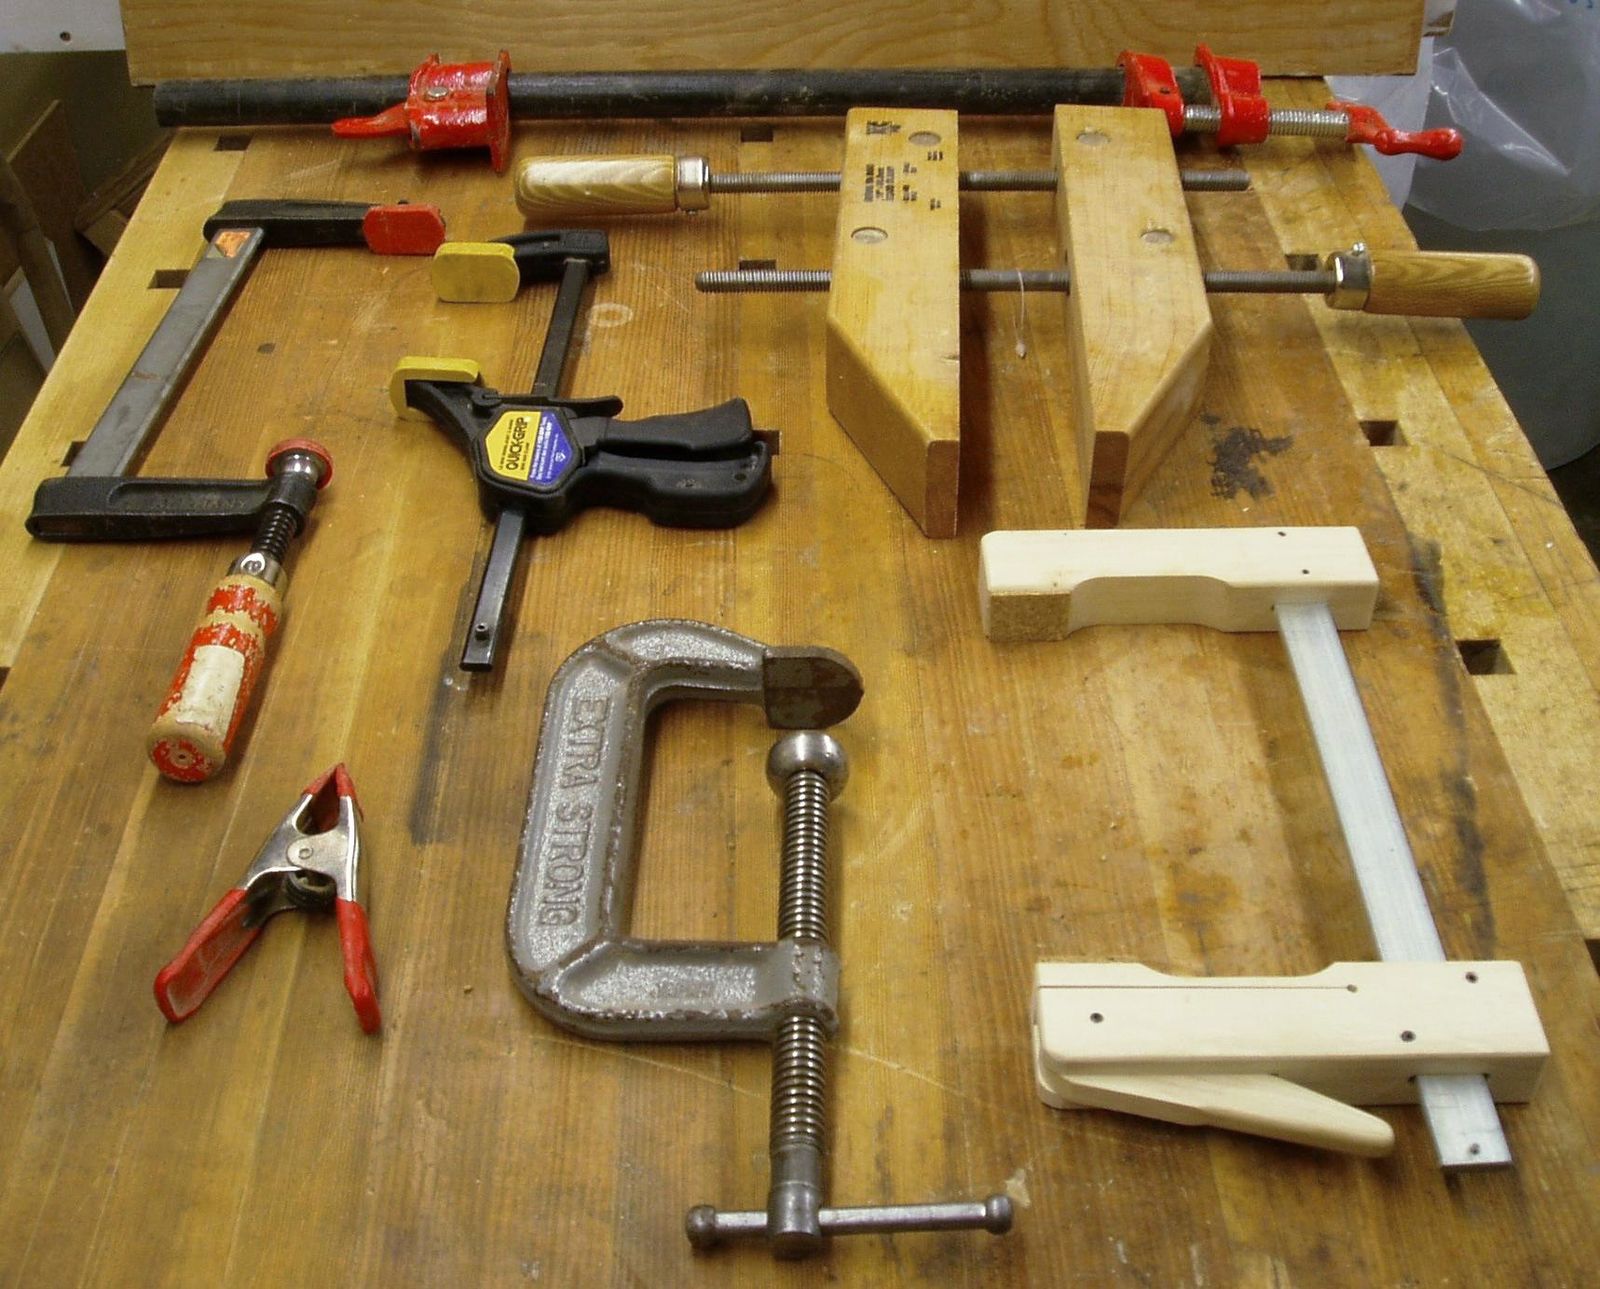
Clamps are the extra hands of a workshop. They hold work still while you cut, drill or rout, and they pull joints tight while the glue sets. There are dozens of designs, and the old saying that you can never have too many clamps is only half a joke. This guide explains the main types, what the numbers on the packaging mean, and how to build a useful set without buying clamps you'll rarely use.
What the specifications mean
- Capacity (opening): the widest gap the jaws can close on. Bar-type clamps are usually sold by capacity, and the bar itself is a little longer.
- Throat depth (reach): how far in from the edge of the work the jaws can press. A deeper throat lets you clamp the middle of a wide board or reach over a lip.
- Clamping force: how hard the clamp can squeeze, quoted in kilograms, newtons or pounds. Makers don't all measure it the same way, so use it to compare clamps within one range rather than across brands.
- Jaw faces: soft pads protect finished surfaces, and large, flat faces spread pressure more evenly.
- Bar stiffness: a bar that flexes under load lets the jaws tilt, which can pull an assembly out of square.
F-style bar clamps: the all-rounder
An F-style clamp has a fixed jaw at the end of a flat steel bar and a sliding jaw that you push up to the work and then tighten with a screw handle. The sliding jaw locks on the bar by friction once it's under load.
Light-duty versions have thin bars and plastic handles; heavier ones have thicker bars, deeper throats and far more force. They are the default choice for general holding, small and medium glue-ups and clamping a straightedge to a board as a saw or router guide; see our guide to circular, mitre and table saws. Watch out for flex in the lightest models: under heavy pressure the jaws splay and the work can shift.
One-handed (quick-grip) clamps: the fastest
One-handed bar clamps, often called quick-grip or trigger clamps, close by ratcheting a pistol-grip trigger and open with a release lever. Because you can position and tighten them with one hand while the other holds the work, they're the most convenient clamp for quick holding jobs and assembly. Many convert into spreaders by reversing one jaw, and most have built-in soft pads.
Watch out for their limited force. They generally squeeze less hard than screw clamps of a similar size, which is fine for holding and light glue-ups but not for pulling a stubborn joint closed.
Parallel jaw clamps: for panels and casework
Parallel clamps have a heavy, stiff bar and tall jaws faced with plastic that stay parallel under pressure. The wide faces spread pressure evenly, which helps keep glued-up panels flat and cabinet carcasses square. Many have feet that hold the bar clear of the bench, and some can be reversed to push parts apart.
They suit furniture and cabinet making best. Watch out for their weight and cost: they're among the most expensive clamps per piece, so many woodworkers build up a set a pair at a time.
Pipe and heavy bar clamps: long reach
A pipe clamp is a pair of fixtures, a screw head and a sliding tail with spring-loaded clutch plates, that you fit to a length of threaded pipe. You choose the length by cutting the pipe, join two pipes with a coupler for very long glue-ups, and move the fixtures between pipes as needed. Fixtures are commonly made for 1/2 in and 3/4 in pipe; the larger size flexes less.
Black iron pipe is the usual choice. Check the fixture's instructions before using galvanised pipe, since the coating can make the clutch slip. Iron reacts with water-based glue and the tannins in woods such as oak, leaving dark stains, so keep the pipe off the wood with tape or wax paper. Watch out for bowing: long pipes bend under heavy pressure, which is one reason to alternate clamps above and below a panel.
Traditional heavy bar clamps use a stiff steel T- or I-section bar with a screw at one end and a sliding stop at the other. In Britain they're called sash clamps, from their long use in assembling window sashes and doors. They deliver a lot of force over long spans, and some accept extension bars. Aluminium bar clamps are a lighter alternative for long, lighter-duty glue-ups.
Spring clamps, C-clamps and the specialists
- Spring clamps work like oversized clothes pegs: squeeze to open, release to grip. The pressure is light, but they're quick and inexpensive, ideal for holding edging strips, templates, thin parts and dust sheets. A handful in two or three sizes goes a long way.
- C-clamps (G-clamps in Britain) have a cast or forged frame and a screw with a swivel pad. They're very strong for their size but have a small capacity and are slow to adjust. They're the standard choice for metalwork and welding set-ups, and for holding work to a drill press table; use pads or scrap wood on finished surfaces. Our guide to choosing a first welder covers metalwork set-ups.
- Specialists: handscrews (two wooden jaws on two screws) grip tapered or odd-shaped work; corner clamps hold mitred frames at 90°; band or strap clamps pull frames and round work together; toggle clamps hold work in jigs.
How the main types compare
| Type | Force | Speed | Best for | Watch out for |
|---|---|---|---|---|
| F-style | Medium to high | Fast | General holding, glue-ups | Light ones flex |
| One-handed | Low to medium | Fastest | Holding, assembly | Limited force |
| Parallel jaw | High | Medium | Panels, cabinets | Heavy, costly |
| Pipe | High | Medium | Long glue-ups | Pipe bows; iron stains |
| Heavy bar / sash | High | Slow | Doors, frames, big panels | Heavy |
| Spring | Low | Fastest | Small parts, edging | Light grip |
| C-clamp | Very high for size | Slow | Metalwork, small areas | Marks wood without pads |
How many clamps you need
Rule of thumb: when edge-gluing boards into a panel, space clamps roughly 15–25 cm (6–10 in) apart, alternate them above and below the panel, and put one within a few centimetres of each end. A 1.2 m (4 ft) tabletop therefore needs around six to eight clamps that open wider than the panel.
A sensible way to build a collection:
- General DIY: four F-style or one-handed clamps of about 300 mm (12 in), two of about 600 mm (24 in) and a handful of spring clamps cover most repairs and small projects.
- Furniture and cabinets: add long clamps (parallel, pipe or bar) that span your widest panels and carcasses, bought in pairs or fours of the same length, since assemblies are usually clamped from both sides.
- Long, occasional jobs: pipe clamps are the cheapest way to cover them, because you only buy the fixtures and some pipe.
- Metalwork: a few C-clamps and locking clamps.
Short clamps are easier to handle; long clamps can do short jobs but are clumsy. Buy most of your clamps in the size you use most, and add others as projects demand.
Using clamps well
- Dry-fit first. Assemble the parts without glue and set each clamp to roughly the right opening, so you're not rushing while the glue sets.
- Moderate pressure is enough. A thin, even bead of squeeze-out along the joint is a good sign; cranking hard can bow a panel and dent the wood.
- Spread the pressure. Straight battens (cauls) clamped across a panel help keep it flat; cover them with packing tape so glue doesn't stick.
- Check for square by measuring the diagonals of a frame or box; they should match. Shifting a clamp's angle slightly can pull it into line.
- Keep them clean. Scrape dried glue off bars and jaws, and store clamps on a wall rack; our guides to workbenches and vises and tool storage cover setting up the space around them.
The short version
- Check capacity and throat depth against the work you do.
- F-style clamps for general work, one-handed clamps for speed.
- Parallel, pipe or bar clamps for panels, doors and cabinets.
- Spring clamps for light jobs, C-clamps for metal and small, strong holds.
- Buy in pairs, start with about ten, and add long clamps when your projects need them.
- In glue-ups, space clamps about 15–25 cm apart and alternate them above and below.
Bloiq is reader-supported. Some links may earn us a commission; it never affects what we write. How we make money.
Cover photo: Luigi Zanasi, CC BY-SA 2.0 ca, via Wikimedia Commons